After spending copious amounts of hours drawing a face, with the most work being put into drawing the perfect eye is one of the best feelings. However, all of that is suddenly sucked out once you realize you still have the second eye to draw, and that it’ll never live up to the beauty and perfectness of the first.
Everyone has this problem, even artists who have spent many years practicing their craft. Usually people will just say to keep practicing until you’ve perfected it- which has some truth to it. However, it would be preferable to start off correctly- although, it would be safe to say that there really is no “right” way to draw the eye.
This article is meant to show what I have learned throughout my years of drawing, and suffering with the second eye.
Step 1

For this example we’ll be drawing the second eye portrait style- which is where the subject is looking straight at the camera, where their face is usually the focal point. You’ll want to start off with a base head, NEVER start off with the eyes first and draw around them from there. Make sure you have the guide lines inside the head so that it’ll help you measure where the eye is supposed to be.
Step 2

TIP! The very first thing to realize when drawing the eyes is to NOT draw one eye at a time. The trick is to draw each eye line for line.
Using the guide lines, draw a curved line- this will be the top of the eye. It’s usually helpful to keep in mind that the tip of the eye is about the same area as the edge of the nose. Depending on what kind of eye type/shape you want, the curve may vary. It usually helps to have a reference picture to look off of as well.
Step 3


This is the part where you’ll want to take note and measure where on the side of the face the first eye lays, so you can replicate it on the other side. In the first picture you’ll want to measure where the top fold of the eye, and the top/bottom of the eye. In the second picture you’ll want to measure the corners of the eye. Notice where on the face the lines are placed, the blue lines at the edge of the nose and the yellow on the neck. Drawing out the measuring lines aren’t mandatory, they’re just meant to help show you where on the face the eye should be placed.
Step 4

Now that you have an idea where everything is, draw in the second curve for the top of the second eye. It is very important to measure where on the face things are since we’re basing a lot of the eyes on this curve.
Step 5


Next is the bottom of the eye. You’ll want to notice that the bottom of the eye starts off semi straight, then curves up to meet the outer edge of the eye. Again, depending on what type of eye shape you want, this may vary. Make sure that whatever you do for one eye, you immediately do for the other.
Step 6


Once you have your eye shape down, you’ll want to start on the details of the eyes, for this step it’s the folds of the eyes. The upper fold is generally pretty close to the eye shape, and follows the curve- but never touches the eye.
Step 7

Next is the bottom fold of the eye, this step is generally the same as the 6th step. The only thing you’ll want to take notice is that the bottom fold is very close to the eye, much more compared to the top fold.
Step 8

Then we move onto the inside of the eye- the circle part. When drawing the circle, you’ll want to draw lightly.
Draw a circle where the bottom barely touches the bottom of the eye, and to top is outside of the eye shape. It is important to have the circle out of the eye, since usually the eyelid covers the top of it up. This way, it makes it look more natural.

As you can see, the pupil in the first picture looks a little wonky compare to the second picture. Don’t be afraid to erase and try again, or use the free transform tool if your drawing digitally.

For this example, I had the eyes looking straight ahead.
Step 9
 After outlining the eye and erasing everything else, draw the pupils and reflective light in the eye. The pupil is placed right in the middle of the circle, and is not meant to be very big. The reflective light in the eye must be in the same place for both eyes.
Step 10
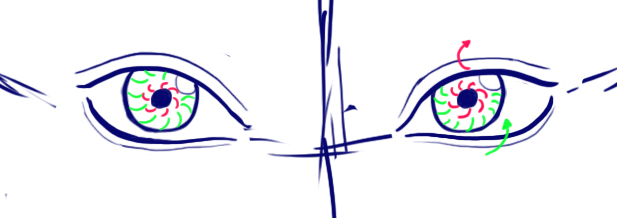
Now for the details inside the eyes. This is when you color in the irises of the eyes. Notice the direction of the curves, how the ones touching the pupil is going one direction and the curves touching the rim of the eye is going a different direction. Make sure that you don’t have the curves curving the same way
To color in the iris, you’ll want to layer the curves over each other to build up the color. Notice how there’s a ring of white between the inner curves and the outer curves. When drawing in the curves you’ll want to leave is space open, this adds dimension to the eyes.
Also notice how the top is somewhat darker than the rest of the iris. This is because of the shadow that the eyelid and eyelashes cast. It’s good to draw in that shadow before you draw in the eyelashes.
Step 11

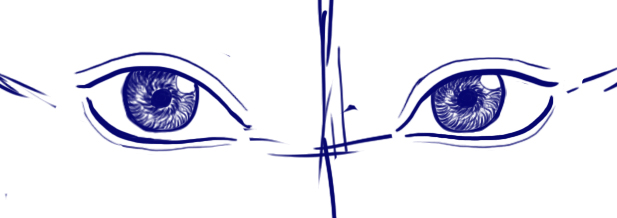
When drawing the eyelashes, notice how they also follow the curve of the eye shape. The outer edges are longer and as they go in they get shorter and shorter. Also, make sure that the curve of lashes get slightly straighter as they go into the eye.

Don’t be afraid to draw the lashes exactly on the line. It looks more natural if they’re on the fold of the eye. Also, take into account the pressure you use when drawing the lashes. You’ll want to lift up on the pressure when finishing the curve of the lash to get that trailed off look.
Don’t forget the bottom lashes. Usually they’re very minimal and small.
Finished Product

FINAL TIP:

That way you don’t get something cartoony and semi-realistic like this.